This is a topic I deal with every day as I do high-end photorealistic color separations for the industry. The original artwork is often created in vector programs but because of the detailed complex content or photographic element they need to be separated in Photoshop.
My best customers send me high resolution files that are at 300dpi or higher and are the final print size for the shirt. And, they use artwork components that are also 300dpi and very sharp. I love these customers.
But, a lot of customers create a high-res file in Corel or Illustrator but then ruin this great piece of artwork by saving it as a low quality JPG image that is not the correct size. I can’t tell you how many times I have emailed customers saying “is there a better piece of artwork or vector version of this?” and the response is almost always – “I have that – I did not know you could use it.”
The good news is that this problem normally happens on the first few orders and slowly I work to train my customers to know what a color separator needs and how to not take a great piece of artwork and screw it up.
Here are some quick tips:
- JPG (or JPEG) file formats are known as Lossy Formats and you lose information when you save the file as a JPG. And, the quality of the JPG can be 0 (junk) to 12 (very high quality). Figure 2 shows a side-by-side of the same image as a 0 and as a 12. In my tests and playing around – I can live with a quality of 9 or higher without having too many issues. If you insist on sending a JPG to the separator then at least first make the file the correct physical size and do a “save as” and save it as a quality of 9 or higher.
- JPG files “average” out areas of color and the lower the quality the more “boxes” and “artifacts” you get around and in images. These areas often get worse when they are color separated. Figure 3. There are a number of JPG Enhancement programs on the market that are inexpensive and they will help improve low quality JPG files. Just do a web search of JPG Enhancement Programs.
- If you create an image in Corel or Illustrator and you need to send the image out to be color separated, save the image as a PDF file. PDF’s are cross platform compatible (Mac or PC) and when they are opened in Photoshop – the person opening the file can determine the resolution of the file. Figure 4.
- Don’t screw up a PDF file by having the image compressed or sampled down. Check the PDF settings. Figure 5.
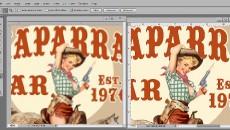
- If you feel the urge to save the file as a PDF and then open it in Photoshop and THEN send the file to a separator – make sure you open it at 300dpi and you UNCHECK “Anti-Alias.” (See figure 4 again) Anti-alias is a graphic program’s way of softening edges. This is great if you are going to print a full color photo or print from Photoshop to you direct-to-garment printer. This is NOT great when you are going do color separations because anti-aliasing softens what should be sharp edges.And, when a separator separates the colors, areas that should be sharp are really soft and they then are halftoned before screen printing. Figure 6 shows the same file opened with (right image) and without anti-aliasing (left image) turned on. The right image has a lot of shadows and shades of color. This is not what a separator wants.
Summary
If you create an image in Photoshop work at 300 dpi at the final image size. If you work in Corel or Adobe Illustrator and create files that must be separated in Photoshop try to start making files PDF rather than JPG. That way the person on the other end can determine the resolution and can turn off anti-aliasing. Don’t try to “help” by making the file a JPG just to make it smaller.
If the file is too large to email then simply use one of the online file transfer services.
The post Stop Ruining Great Artwork by Scott Fresener appeared first on .


